 | Reviving Collapsed Plywood Archtops
|
|
by:© Steve Carmody
| |
Some people love
L-5's and Es-150's, and others love Kay's, Harmonys, and yes Silvertones. Sold in
department stores in the 50's ,they are still available for reasonable prices and some are
well worth it.
Steve Smith of Washington, DC
has one of the most extensive collections I've seen, and he gigs with them every week of
the year.
Steve is a Blues player and he loves that gritty sound those
old pickups give. Some of his extensive collection are carved spruce tops, but many are
pressed plywood. In some cases the ply tops are reinforced with bracing, (as are the solid
tops), but many, like this metal clad Silvertone, are not.
Without support braces running parallel with
the neck, the tops have a tendency to sink over time, right between the pickup routs. This
causes the pickups themselves to drop so far below the strings that they seem to have lost
output. In fact, they are just too far away from the strings to get a signal. Many of
these instruments end up in the closet because they just haven't got any sound. But there
is a remedy.
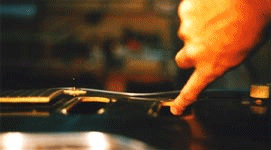
 First the pickups are removed and an inspection
of the top is done. Even without the pickups there is usually a detectable depression in
the area of the pickup holes. Over time the top has collapsed here because there is no
bracing. In some cases a brace may have been installed that was not big enough or long
enough, it must then be removed. If the top tends to be depressed without string tension a
jack should be placed inside to gently lift the top into the desired curvature. First the pickups are removed and an inspection
of the top is done. Even without the pickups there is usually a detectable depression in
the area of the pickup holes. Over time the top has collapsed here because there is no
bracing. In some cases a brace may have been installed that was not big enough or long
enough, it must then be removed. If the top tends to be depressed without string tension a
jack should be placed inside to gently lift the top into the desired curvature.
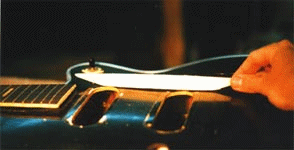
 A nice piece of quarter sawn spruce must then
be roughed out to the approximate length and left slightly taller then desired. On the
treble side the brace usually cannot extend past the volume controls , but on the bass
side it can extend as long as you can fit it (I think a long well fitted brace can
enhance the clarity of the tone). I then lay the brace on top of the guitar, in the
position I want it to sit. Holding a pencil I rest my index finger on the area between the
pickup holes (usually the high spot of the preferred arch) and set the tip of the pencil
at the top of the rough cut brace. I then slide my finger (and the pencil) toward the
neck and then toward the tail end of the guitar. This pencil line on the brace serves as a
starting point for establishing the inner curve where it will contact the inside face of
the top. A nice piece of quarter sawn spruce must then
be roughed out to the approximate length and left slightly taller then desired. On the
treble side the brace usually cannot extend past the volume controls , but on the bass
side it can extend as long as you can fit it (I think a long well fitted brace can
enhance the clarity of the tone). I then lay the brace on top of the guitar, in the
position I want it to sit. Holding a pencil I rest my index finger on the area between the
pickup holes (usually the high spot of the preferred arch) and set the tip of the pencil
at the top of the rough cut brace. I then slide my finger (and the pencil) toward the
neck and then toward the tail end of the guitar. This pencil line on the brace serves as a
starting point for establishing the inner curve where it will contact the inside face of
the top.
 Once the brace is roughed out, the brace is held in place
and a pencil mark scribed at the center of each pickup hole , and then to the brace to
mark the spot where it is being held. As the brace fit is refined it can set back in the
same spot each time it is removed for sanding or scraping. Once the brace is roughed out, the brace is held in place
and a pencil mark scribed at the center of each pickup hole , and then to the brace to
mark the spot where it is being held. As the brace fit is refined it can set back in the
same spot each time it is removed for sanding or scraping.
The fit of the brace is viewed with a mirror
and inspection light set inside the guitar. All the gaps between the brace and the top are
removed until it sits flush with the inner curvature of the top. This is essential because
a gap could cause vibration after the brace is glued in.
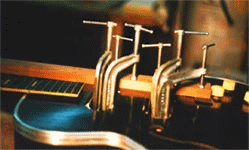 When a perfect fit is achieved the brace is glued in (the
jack on the inside is removed) . I like to use a hardwood brace propped above the top
with cork pads at either end. This clamping brace never actually touches top, and allows
me to press the inner brace into the curve to which it has been fitted. When a perfect fit is achieved the brace is glued in (the
jack on the inside is removed) . I like to use a hardwood brace propped above the top
with cork pads at either end. This clamping brace never actually touches top, and allows
me to press the inner brace into the curve to which it has been fitted.
With the bracing installed ,the pickups sit close enough to
the strings (hopefully!) to get that good old crunchy blues sound that Steve Smith
loves.
|