|
| Repair Articles |
|---|
| Ask The Repairman |
| Repair Blue Book |
| Hardware Parts Accessories |
| Electronics |
| Guitar Wood and Kits |
| Tools |
| Friends |
|
|
|
|
|
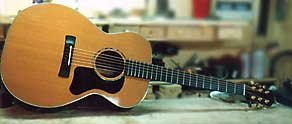
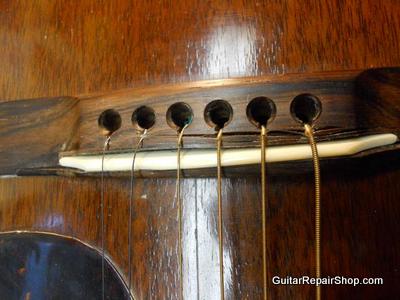
Replacement Bridge FabricationBy Steve Carmody c. 2015One of the more interesting aspects of guitar repair and restoration is that not infrequently, parts must be fabricated by hand. Producing an accurate reproduction part can be one of the more challenging jobs for a luthier. But sometimes, particularly when working on older guitars, you are faced with a choice of how faithful to be to the original styling or construction materials. In most cases I would suggest, and personally incline towards, trying as closely as possible to duplicate the original parts unless there is some structural reason why this would not be a good idea. But some of the materials used in older instruments are either no longer available, or in some cases are controversial, so staying completely true to the original can be a challenging issue. For example, elephant ivory was used for many years for nuts and saddles but, even though it is still available, there are serious ethical questions about its use. Brazilian rosewood is also a material that was used for decades as a tonewood of choice for backs, sides, fretboards and bridges. But since 1992 it has been listed under the CITES treaty as an endangered species of wood which makes its use, even if the wood was harvested prior to 1992, politically fraught. All of this said, it is a fact that I have (purchased 20 or so years ago, and sold as pre-CITES harvested wood) a small number of pieces of Brazilian rosewood which have been cut and sized for use in fabricating replacement guitar bridges. Often when working on Martin guitars of a pre-1970 vintage, I will use this wood when I fabricate replacement bridges. When this supply is gone I will purchase no more Brazilian rosewood even if it is available, but I have made the decision to use this wood, versus destroying it. Recently, two Martin guitars, a D-18 and an O-15, were brought me and they both had cracked bridges. In the picture below, you can see that the bridge of the O -15 has a crack that runs through the saddle slot and the saddle has collapsed forward.
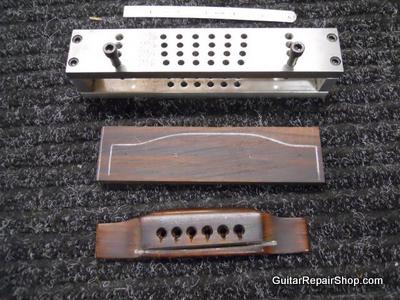
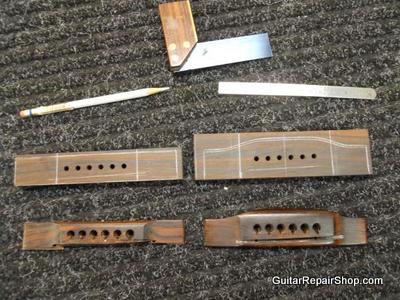
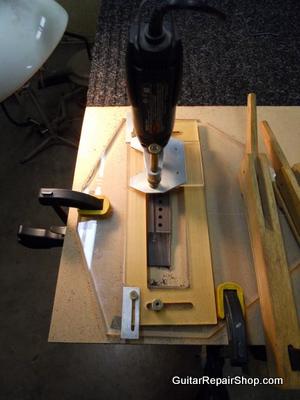
In some cases a crack in the body of a bridge can be successfully repaired, but I generally replace bridges that have cracked at or along the saddle slot. The potential for them re-opening is just too great. The following is a description of how I make a new bridge: The first step in fabricating a duplicate bridge is to remove the broken bridge. Once I have removed the bridge I trace the shape of the old bridge onto a squared and thicknessed blank of appropriate wood. For these two bridges, since they were fitted with Brazilian rosewood bridges when they were first made by the Martin company, I will use some of the Brazilian rosewood that I have here in the shop. Replacement bridges for most Martin guitars made after 1970 would be made from east indian rosewood. The new bridge will be fabricated from a block of wood which is sized to slightly larger dimensions than that of the old bridge. On the assumption that the string height of the guitar was acceptable before the bridge cracked, the goal will be to make the new bridge to the exact thickness as the old one and the block of wood should be slightly thicker than old bridge to allow some loss of wood during the fabrication and fitting process. If the neck is going to be re-set, the final thickness can generally be anywhere from 10-12/32 of an inch and the blank should be slightly thicker at the beginning of the fabrication process. At least one long side plus the top and bottom of the new bridge blank should be checked for square and corrected if necessary. I find it best to establish the side that I want to be the front of the new bridge, orient the front of the old bridge to this side and make a tracing of the outside of the old bridge with a white pencil. I then mark the location of both E string holes with an awl and then enhance the marks with a white pencil to make them easier to see. At this point you could measure and mark the individual string hole locations and then carefully drill the string holes, but I prefer to use a jig manufactured by Luthiers Mercantile (lmii.com) which is designed for this purpose.
Here is the jig in use.
If I am happy with the orientation of the saddle on the old bridge I will use the old saddle slot as a guide for locating the new saddle slot. To do this, I drill a small hole at either end of the saddle slot in the old bridge, I lay the old bridge in place on the bridge blank, and then can use either a white pencil or awl to mark two points slot location on the new blank. This will establish the angle for cutting the new saddle slot.
Once the string holes are cut, the outer shape of the bridge should be refined to fit the footprint of the old bridge on the top. This and the rest of the contours of the bridge are established first by using the stationary belt sander with a 120 grit or coarser belt, and then are refined with scrapers, sand paper, steel wool. Lastly, the bridge is polished on a buffing wheel. The goal is to exactly copy the contours of the old bridge, so frequent reference to the original bridge with an eye to detail is necessary. One thing I have noticed about older Martin bridges is the declining slope of the thickness of the body of the bridge from the bass side at the E string location to the treble side at the high location. Recreating details such as this are crucial to making a convincing reproduction.
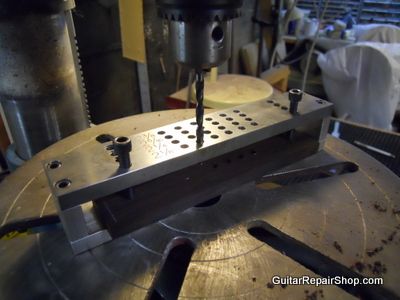
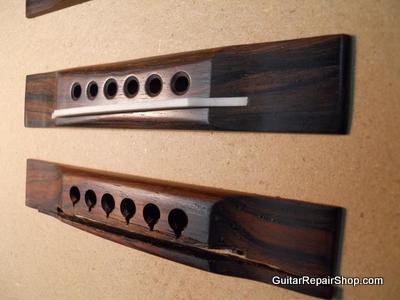
I then adhere the bridge blank to a work board with 2 dots of yellow glue. This will hold the blank in place during the routing process but the blank can be cleanly removed with a spatula or chisel. The saddle slot is then routed using a jig designed hold a routing tool and is adjustable to the correct angle for the saddle slot position. Here are the finished and polished bridges, alongside the cracked bridges they will be replacing.
Steve Carmody is an independant guitar repairman and luthier with a shop in Silver Spring, Md. He has been doing guitar repair and restoration full-time since 1990. Questions about this article or anything else related to guitar repair? Send e-mail to - GuitarRepairShop@aol.com |